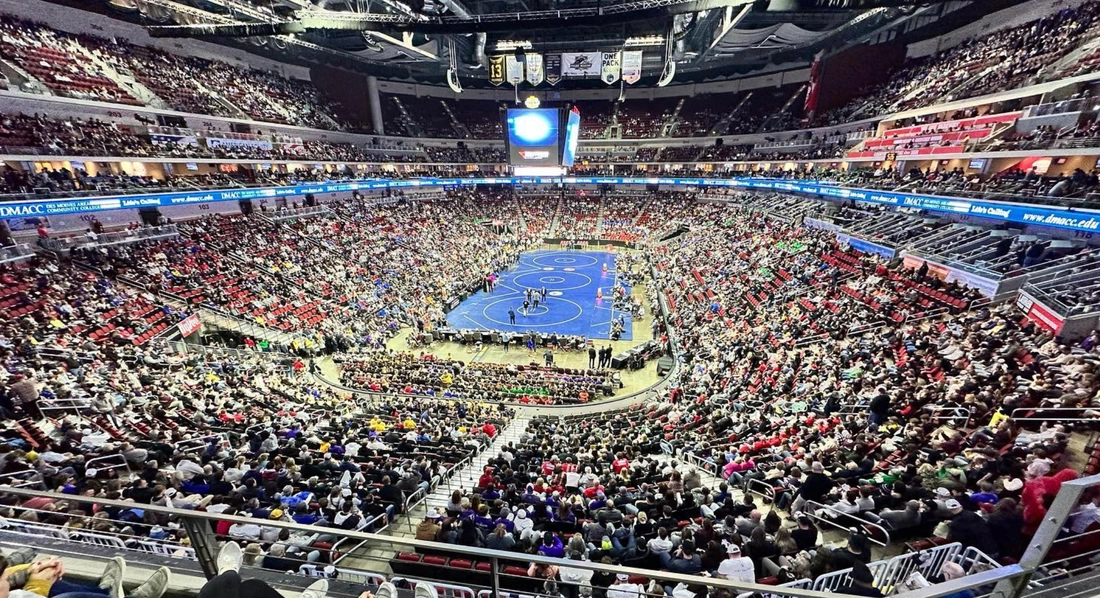
 As the wrestling season winds down and the postseason tournaments soon approach, it is important to make sure that your body can recover so that you can compete to your highest level. It’s easy to get worn down, banged up, and exhausted in February and March if your recovery isn’t enough to meet the demands you are placing on your body. You spend a lot of time on the mat between practice, duals, and tournaments and it can be easy to overlook the important time spent off the mat refueling and recovering.
Key Components of Post-Wrestling Recovery: 1. Nutrition: We all need fuel to supply our engines, and our bodies are no different. After practice and competitions, our muscles need to have the right building blocks to recover fully. Aim to replenish your glycogen stores with carbs like potatoes, rice, and pasta to have plenty of gas in the tank for when you step on the mat again. Eat high-protein foods like chicken, eggs, beef, or a good quality protein shake to repair your muscles after working them in training or practice. Reduce inflammation with anti-inflammatory foods like fruits, vegetables, and omega-3 fatty acids found in fish. 2. Hydration: Being dehydrated can hinder performance on the mat and impede recovery after you step off the mat. Aim to drink plenty of water throughout the day, especially before, during, and after workouts. Shoot for over half your body weight in ounces per day. Electrolyte-rich drinks can also help replenish lost minerals in sweat and help support your overall hydration throughout a day of competing. 3. Rest and Sleep: Sleep is when the body repairs and rebuilds itself. Aim for 7-9 hours of quality sleep each night to optimize recovery. Create a sleep-friendly environment that is dark and cool and limit screen time before bed. Being consistent with your sleep schedule helps to make sure that your body can adequately rebuild and repair itself each night. 4. Active Recovery: Mix in low-intensity activities such as light stretching, mobility work, yoga, or swimming to promote blood flow, alleviate muscle soreness, and enhance recovery without adding excessive strain or impact on the joints of the body. 5. Mobility: Self-myofascial release techniques like foam rolling, lacrosse ball work, and massage can help alleviate muscle tension, improve flexibility, and enhance recovery. Make sure you fully warm up before practices and tournaments to get your blood flowing and move your joints in all directions and ranges of motion. 6. Cold Therapy: Ice baths, cold showers, or cryotherapy sessions can reduce inflammation, numb soreness, and accelerate recovery by constricting blood vessels and flushing out metabolic waste products. When it comes to post-season wrestling, getting your hand raised lies not only on the work you have put in since the beginning of the season but also on the ability to recover effectively from training and competition. By having a recovery routine that addresses nutrition, hydration, rest, and recovery modalities, wrestlers can ensure that their body is feeling their best when it matters the most. The hay is in the barn and the work you have put in throughout the season is done, time to go out and compete at your best and accomplish your goals! Tanner Zimmerman D.C.
0 Comments
 As an athlete, it can be difficult to know when and how to return to sport after an injury. In order to ensure a safe and successful return, graded exposure is an important step. Graded exposure is a process of slowly returning to sport and involves the athlete gradually increasing their activity level.
For high school and recreational athletes, it is important to understand the difference between going from rehabilitation directly into a game and slowly returning to sport. Going from rehab directly into a game can be dangerous and can lead to further injury. By slowly returning to sport, athletes are able to gradually increase their activity level and reduce the risk of re-injury. When returning to sport, there are a few ways to ensure a safe and successful return. One way is to use yellow jerseys in practice to protect from contact. This allows athletes to get back into the game without the fear of contact and can help them to gradually increase their activity level. Another way to slowly return to sport is to mimic athletic motions that happen in the game during practice. This allows athletes to practice the same movements they would be performing in a game, without the risk of contact. Overall, graded exposure is an important step for high school and recreational athletes when returning to sport after an injury. By slowly returning to sport, athletes are able to reduce the risk of re-injury and ensure a safe and successful return.  When it comes to shoulder pain, the acromioclavicular (AC) joint is a common source of discomfort. This joint, which is located between the clavicle (collarbone) and the scapula (shoulder blade), is integral in the movement of the shoulder. The shoulder is a complex joint made up of three main joints: the acromioclavicular (AC) joint, the sternoclavicular (SC) joint, and the glenohumeral joint. The AC joint is located where the clavicle meets the acromion of the scapula and is responsible for providing stability between the shoulder and the chest wall. The SC joint is located between the clavicle and the sternum and is responsible for providing a connection between the shoulder and the axial skeleton. The glenohumeral joint is a ball and socket joint that allows the arm to move in multiple directions. 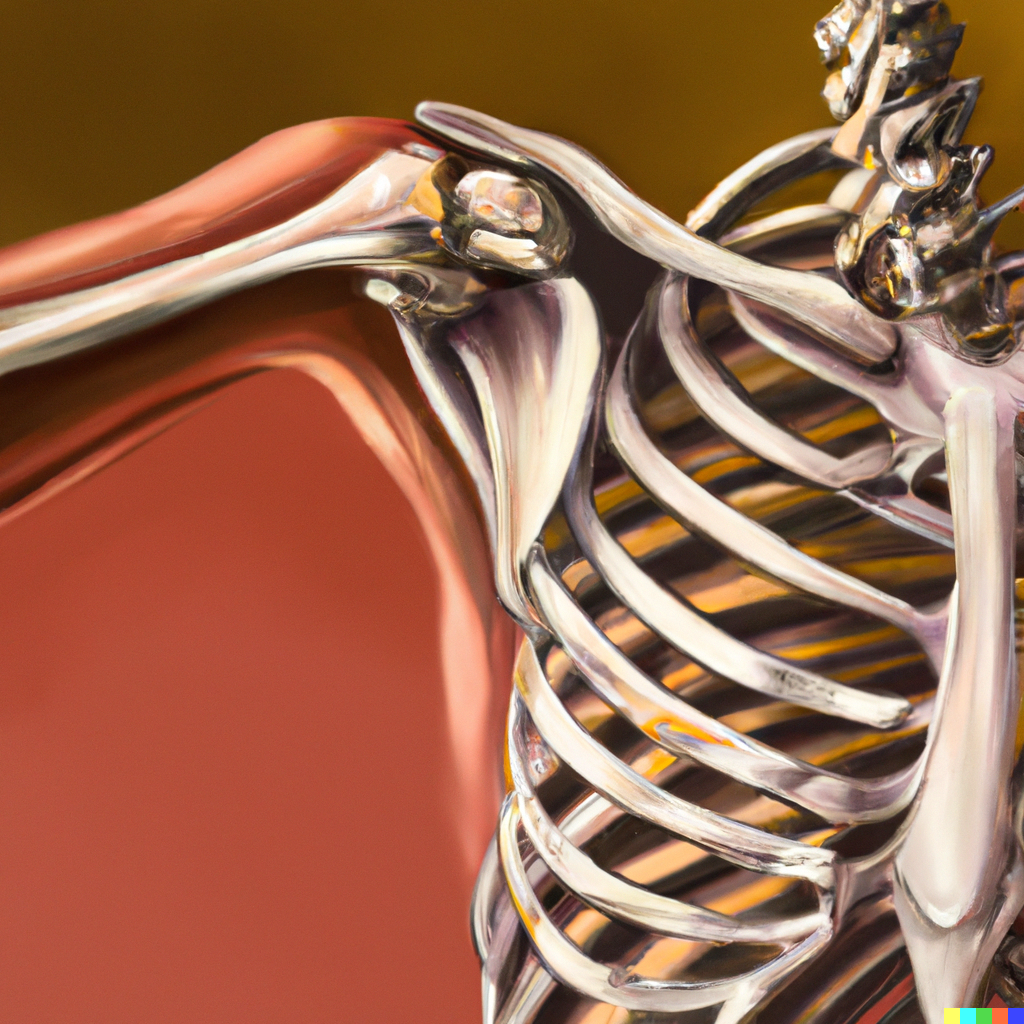 The clavicle acts as a tether between the body and the scapula, and it is essential for the shoulder joint to move properly. Think of movement the shoulder joint as the hands of a clock. As the clock hand moves around the clock from 6 to 9 o'clock, the clavicle doesn’t move, but the shoulder joint does. From 9 to 11 o'clock, the SC joint moves, and from 11 to 12 o'clock, the AC joint moves. If the tissues surrounding the clavicle, such as the pectoralis major and latissimus dorsi, are not able to move freely, then more stress is placed on the AC joint. This can lead to pain in the AC joint, which can range from a dull ache to a sharp pain.  If you are experiencing pain in the AC joint, Team Chiropractic can assess the movement of the shoulder joint and surrounding tissues to determine the cause of your pain. Treatment options may include chiropractic adjustments, manual therapy, and exercises to help restore proper movement and reduce pain.
By addressing the underlying cause of your shoulder pain, a sports and rehabilitation chiropractor can help you find relief and get back to doing the activities you love.
Recently, I was asked by a local gym to lead a class on Foam Rolling and Ball Mobility. We broke the class up into two parts, each with corresponding handouts which are attached to the blog post in PDF format. The first class/handout covers foam rolling and the most common areas to use the foam roller. The second handout describes the most common areas to mobilize with a mobility ball. For around $20 (ruffly the cost of a co-pay) you can purchase a ball and roller to keep your body mobile and supple for decades. Remember an ounce of prevention is worth a gallon of cure!
The 5th season of Downton Abbey gets two things right with its cast of aristocrats and downstairs help: Great Drama and even Better Posture! Check out 10 posture tips from the shows main characters. If the internet has done one thing for the world, it has made average people into “experts” on almost any topic with just a few clicks. My personal area of internet pseudo expertise is in the field of auto mechanics (just ask my wife how many times I’ve tried to save money fixing the car myself). It seems so easy on Youtube, and message boards always have creditable information, right? The same can be said for fitness and sport injuries information on the web. I believe the majority of content on the web is generally reliable (you are most likely reading this online), the problem starts when fundamentals are glossed over or basic concepts are assumed. In the world of functional exercise a great deal of attention is placed on athlete’s injuries, but not enough time and emphasis is spent on correct posture to prevent injuries. As fitness coaches and organizations push to continually challenge and vary workouts, one of the undervalued fundamentals of shoulder and spinal health, is the posture of the thoracic cage. I believe if coaches and athletes spent more time focusing on the posture and movement of the thoracic cage during exercise, several shoulder and spinal injuries could be prevented. Believe it or not, by simply observing the positioning (posture) of the thoracic cage prior to an individual preforming an exercise, you can estimate how successful they will be at performing the exercise. 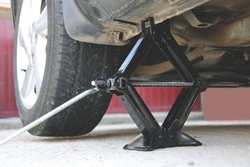 My novice ability to fix a car is the perfect analogy as to why the position of the thoracic cage is so important during exercise. A few years back I needed new brake pads for my car, so I pulled up a trusty YouTube video, ordered my parts online, and took on the automotive challenge in the driveway of my new house. As I jacked up the car, I failed to notice that the driveway at our new house had a slight slope compared to our old driveway. Just as I removed the second front tire, the car began to slowly lean backwards. I jumped away as the car slipped off the car jack and crashed to the ground. In this analogy, the sloped driveway represents the thoracic cage, the jack represents the scapula (shoulder blade), and the car is the shoulder. In the rehab world, a great deal of emphasis is placed on “scapular stability” to help injured shoulders. I am here to tell you that scapular stability is functionally impossible to obtain if the thoracic cage is out of position. The bigger the slope in the driveway, the more unstable the car jack is! The thoracic cage consists of the spinal bones of the mid back (thoracic spine), the attaching ribs, and all of the muscles that attach to the bones and cartilage. The accepted term for faulty positioning of the thoracic cage is a “rib flare”. 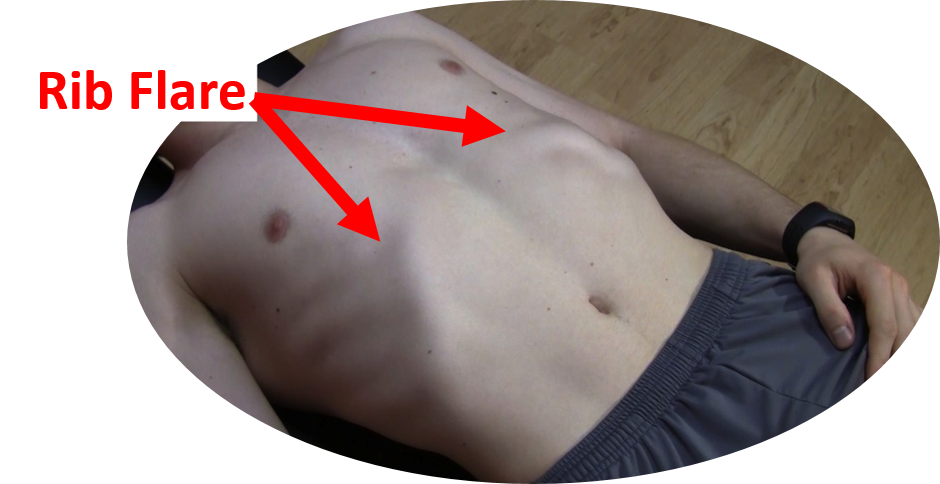 Picture taking a deep breath into your lungs and holding it, the resulting rib position would be an example of a rib flare. The entire ribcage is elevated and the base of the front of the rib cage is protrudes forward and out. Functionally this causes a lot of compromise in the body:
 Why does a rib flare commonly occur in functional exercises like pull-ups, squats, push ups and overhead pressing? I think the number one reason people continue to exercise with a rib flare is that it provides “passive” stability when preforming explosive movements. “Active” stability is achieved by correct activation of stabilizing muscle groups in the region. For example, the abdominals and the muscles of the mid back. If the stabilizing muscle groups are inactive or weak, athletes will start to use the end range positions of their joints to provide a base of support for their body as they exercise. Meaning: the lower back joints lock into hyperextension and a rib flare causes the thoracic cage to become rigid and compressed, all to make up for a lack of active muscular stability. There are a few problems with this postural fault:
When I went back and re-watched the automotive Youtube videos after dropping my car, of course I saw there were blocks behind the tires when they jacked up their car. A slight detail that I originally overlooked. Now, anytime that I jack up the car, I place blocks under the tires to prevent the car from rolling down the driveway again. Going back to the shoulder analogy, the “tire blocks” represent our rotator cuff muscles. The number one job of the cuff muscles is to keep the shoulder stable in its socket. Athletes always ask me why their cuff muscles are tight and sore. I tell them it’s because of their posture; they usually give me a funny look. After a few visits they start to understand positioning the thoracic cage correctly during activity, enables the scapulae to stabilize in the thoracic wall, greatly reducing the stress in the lumbar spine and rotator cuffs. Correcting a rib flare may be as simple as tightening the core muscles to pull the rib cage back down prior to and during an exercise. But, in an athlete that has had a rib flare for several years, it may take longer to correct the problem. First they have to regain the mobility of the thoracic spine and rib cage. The best way to combat a long-term postural problem is a ton of foam rolling (don’t forget to roll out the ribs) and dynamic mobility exercises. The mobility exercises must be followed up with a retraining program targeting core/glute/ and scapular muscle activation and strength. Video analysis can be used to help the athlete visualize correct posture during exercise too. In summary- Strengthen your core and do more mobility work on your thoracic cage. Do not constantly hyperextend your lower back and flare your ribs when exercising Be sure to pay attention to details, and most importantly, never let me fix your car! By Dr. Chris Feil 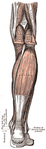 Over the last few weeks I've had several patients come in to Team Chiropractic and Rehab of Ames with calf strains. These people have hurt themselves running, golfing and kickboxing. All of these activities demand a lot of strength and explosive power from the lower body (yes golf is a lower body sport). It makes sense that an increased demand on the two muscles of the calf (gastrocnemius and soleus) would lead to a possible overuse and injury. Typically, a calf strain consists of a small portion of the muscle fibers tearing, resulting in a painful inflammatory reaction. At Team Chiro, we don’t just aid our patients in healing faster, we try to educate our patients on why their injury occurred and what they can do to prevent it from happening again. Functionally, I believe calf strains occur when there is a loss of motion in the ankle and/or a loss of functional gluteus strength. There are several reasons why modern man’s ankles become tight. First, most of us end up sitting in a desk /car all day, or we stand all day on flat hard surfaces. In both of these situations, the ankle is not challenged in all three plains of motion like it would be if we lived and worked all day on a primitive farm. As the old saying goes, “you use it, or you lose it”, well most us lose it when it relates to ankle mobility. Another common cause of lost ankle mobility is improper healing fallowing an ankle sprain. It is very common for the injured tissues of an ankle sprain to heal in a manner that restricts motion in the ankle if it is not properly rehabbed. (Hint: don’t just brace up a sprained ankle for a few weeks and call it good, get it checked out by a sports medicine professional.) When an ankle stops moving effectively, the muscles of the calf suffer. Say you lose 25% of your ankle range of motion, now physiologically the calf muscles begin to adapt to their new demands. The fibbers that help the muscle open up to it normal range of motion begin to contract over time. I use the analogy of some glue being spilled inside your muscle and hardening around the fibers that are no longer stretched due to the restricted ankle motion. Now, when this individual with the restricted ankle and compromised calf muscle tries to do something explosive like run up a hill, hit a golf ball out of the heavy ruff, or burnout on roundhouse kicks, their calf is setup to fail. The injury will occur when the muscle fibers of the calf that are doing all the work fatigue, or when the person puts the foot in a position where that lost 25% range of motion is needed and the weak contracted (glued) muscle are challenged. 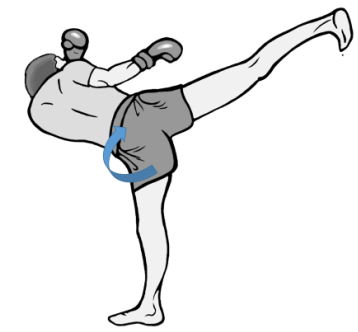 Another interesting theory on why people strain their calf muscles is that the calf is compensating for weak glutes (your butt muscles). The human glutei muscles are the largest muscles in our bodies, yet many of us don’t use them effectively. Functionally, our glute muscles extend and rotate the hip/pelvis, propelling our bodies forward. Technically, our calf muscles can mimic the forward propulsion that the glutes perform, only from the ground up. But, that’s a lot of extra work placed on the calf, leading to overstrain and injury. It’s easy to visualize the mechanism of calf muscle compensation when you think of someone running up a hill without the ability to powerfully extend their hips. It’s harder to visualize the weak glutes and an overstrained calf in a golf swing or a roundhouse kick. The calf that typically gets overstrained is the rear leg in the golf swing and the calf in the kicking leg; it is actually compensating for the opposite side glute muscle weakness. Yes the opposite glute, if you are kicking with the right foot, the left hip/glute is where you start to generate all of the power for the right leg. When the left glute contracts it helps pull the pelvis and torso around, initiating a powerful impact with the bag. The calf injury will occur when the calf on the kicking leg pushes off the ground, trying to compensate for the weak pull of the opposite hip. 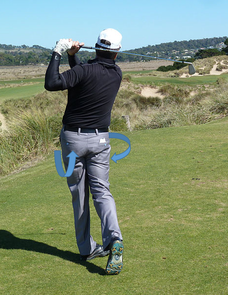 In golf, both glutes are important to a powerful efficient swing. On a right handed swing, the left glute will extend the pelvis, while the right will help with pelvic rotation on an explosive follow-through. If the glutes don’t activate the golfer will have a difficult time staying down on the ball (early extension); part of that problem starts in the calf musculature trying to excessively push the body off the ground to force the needed extension and rotation to swinging club.
The moral of this blog post is stretch your ankles and calf muscles, and don’t ignore your glute muscles when it comes to preventing future calf strains. If the glutes don’t contract, a person can compensate and try to generate all of the needed force from the calf to try to push the body into rotation and extension. Of course you can only do this so long before something breaks down! 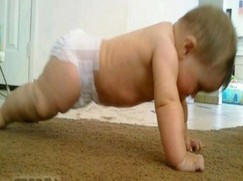
Believe it or not, when you were 10 months old, you probably had better push-up form/technique then you do now! How can that be? It’s actually quite simple, a healthy infant trains their stabilizing muscles all day long. They do this by the simple act of crawling. When you think about it, spending all day on your hands and knees does wonders for developing the muscles that run from your back and ribs to your shoulder blades (scapula), these muscles are what we in the rehab community call scapular stabilizers. Specifically, the scapular stabilizing muscles are: lower trapezius, serratus anterior, and rhomboids. Unfortunately these muscles are often underdeveloped and neglected.
As we get older, we tend to stop using the scapular stabilizing group of muscles in our modern lives. We spend hours sitting or standing with sometimes not so great posture. Even people that “go to the gym”, may not have an adequate ability to control their scapula because many of the exercises they preform are pushing exercises (there is a difference between a bench press and a push-up functionally). It is not coincidence that many of my patients that have shoulder pain and or neck pain/mid back, have tight chest muscles (Pec and Pec minor) and tight muscle that run from the neck to the shoulder (upper trapezius and levator scapula). Typically these muscles tighten because the scapular stabilizing muscles are under developed and under-utilized, leading to a rounding of the shoulders and an observable “winging” or elevation of the shoulder blades. Back to the baby push-ups to crawl effectively an infant must be able to keep their shoulder blades “glued” to their rib cage. This allows them to shift their body weight from one arm to the other as they pivot and crawl forward. Without this ability to stabilize their scapula, they would not be able to move from one arm to another while holding up their body. This concept of scapula hugging the rib cage is the big difference between a proper push-up and an exercise like a bench press. Bench pressing is grasping a weight and moving your hands up and down, actually the opposite motion of a push-up functionally. Preforming a proper push-up is really about using your shoulder blades to lift your torso up and down, much like the infant uses the shoulder blade to control the body while crawling. The concept may seem simple, but most people focus on their arms and hands too much when preforming push-ups and actually put their shoulders in a compromised position leading to increased strain on the shoulder and eventually impairment. Instead, focus on the tips below to help you revert back to your perfect baby style push-ups: · Start on the ground perfectly flat, lift the hands up of the ground and squeeze the shoulders blades down and back. (Keep the shoulder blades glued to the rib cages during the whole push-up movement) · Place the hands on the ground using a narrow hand position · Keep the hands below the plane of your shoulders · Direct the crease of your elbows forward (toward the direction of your head) as you push up · Shift the weight in your hands off the index finger and thumb to a more balanced palm pressure · Keep your pelvis and lower back in a neutral position · Keep your chin tucked in and your head retracted back. 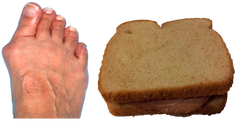 My title of this blog may seem strange. Most people tend to lose their appetites for finger foods like sandwiches after looking and talking about feet, especially feet with bunions. I’m actually going to use the layered concept of a sandwich to explain why and how many bunions form. 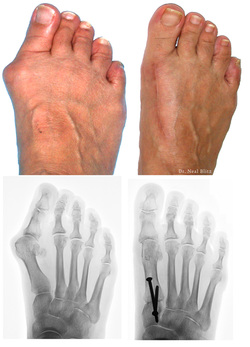 What is a Bunion? A bunion is described as an enlargement of bone/tissue around the joint of the big toe. The medical term is “hallux abducto valgus deformity”, but commonly called a bunion. Bunions almost single handily keep podiatrist busy in this country. Yet, in third world countries where poor fitting shoes are not as common, bunions are not as common. What Causes a Bunion? Although most people view bunions as a bone problem in the foot, in reality most bunions are truly caused by muscular imbalances in the foot. There are several layers of muscles in the foot, I like to use the analogy of sandwich when explaining the muscular foot layers and how imbalance between the layers can lead to a bunion. The first and third layers of foot muscles are the bread layers of the foot. The bread muscles (first and third layers) are called intrinsic muscles, meaning the muscles start and end in the foot and do not travel into the upper leg. These muscles hold the bones of the foot together and give it its shape (posture), just like the bread holds a sandwich together. The second layer of muscle are the long muscles of the foot, they actually start deep in the back of the leg and travel around the ankle and attach to the bottom of the foot. The long muscle of the second layer are very strong and help push our bodies trough locomotion, they are definitely the meat of the sandwich. 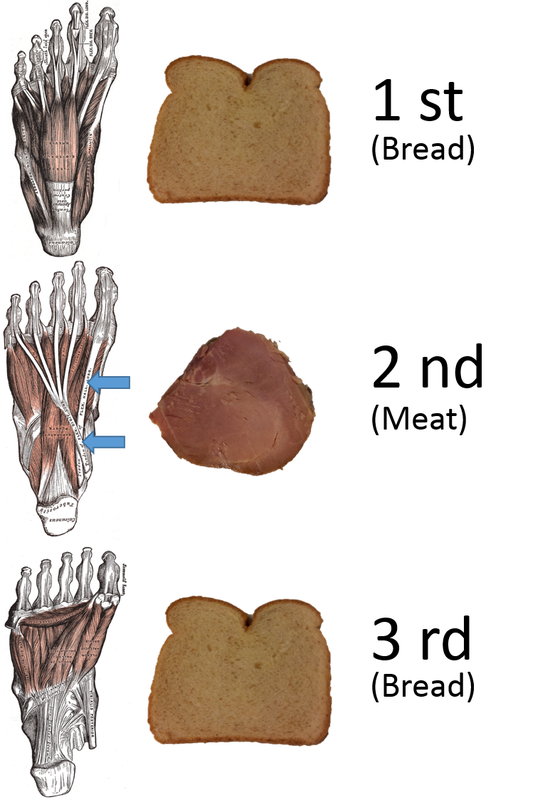 Problems occur when you try to make a sandwich without bread. Ponder this theoretical question, if you make a sandwich without bread, does it actually exist? (Enough with the Akins diet questions, I’m getting hungry) When the first and third layers of muscles that help stabilize the posture of the foot become week or inactive, the strong muscle of the second layer take over. There are two major long muscle that make up the second layer. One attaches to the tip of the big toe, and the other muscle’s tendon splits to attach to the bottom tips of the 4 small toes of the foot. When these long muscles become dominate in foot function, they cause hammer toes in the 4 smaller toes and a bunion in the big toe. (Hammer toes will be discussed in a future blog) Bunions usually form in 4 stages. The first stage may not be very observable, but if you test the strength and function of the intrinsic muscles of the foot (bread muscles) they will be very weak and the balance of the foot will be stable. Over a long period of time if the dysfunctional muscle imbalances are not corrected in the first stage, an actual shifting of the great toe will occur due to the pull of the Flexor Hallucis Longus (meat layer muscle that connects to the tip of the big toe, pointed above by the blue arrow). Because of the orientation of the muscle and its attachment site, it will cause the big toe to move laterally (over to the smaller toes). In a normally functioning foot several of the intrinsic muscles provide adequate opposition to this pull of Flexor Hallucis Longus (ying and yang relationship). But, when the short intrinsic postural muscles are weak and turned off, the long muscle of the foot will over-compensate and structural changes happen. The final and fourth stage is when the prolonged pull gets so great that the actual metatarsal (forefoot bone that connects to the base of the big toe) becomes wedged in the opposite direction, and TA-DHA, you have bunion. 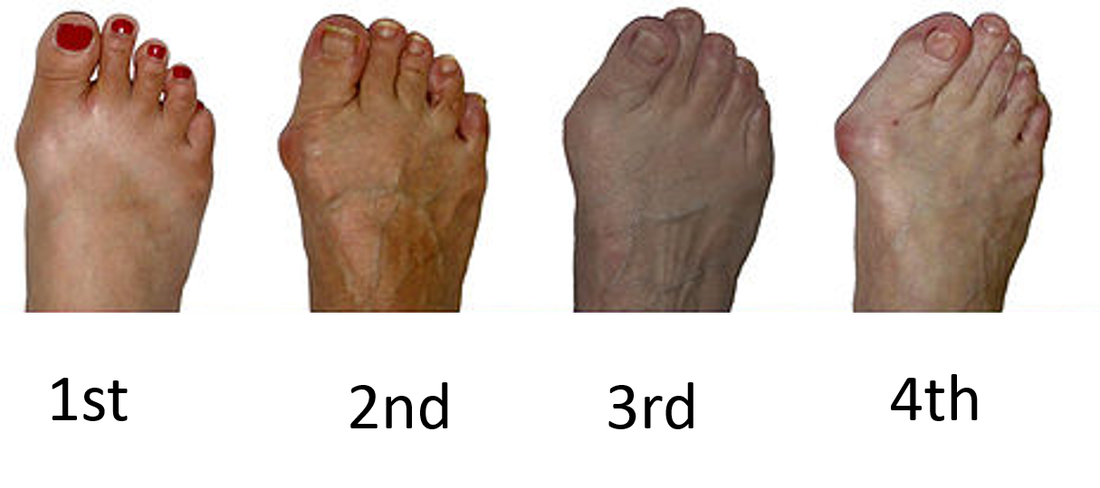 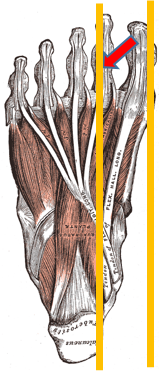 Why do Bunions Occur? I believe the muscular imbalances that cause bunions occur from either natural causes or un-natural causes. Natural causes of poor foot function are due to injuries or improper foot development during childhood. In both of these scenarios over-pronation of the foot is the driving factor for the resulting muscular imbalance that causes the bunion formation. Technically, I might be more correct in saying the lack of mid foot supination in the propulsion phase of gait is the problem (meaning: the main arch of the foot does not raise during push off). The most common injury to the foot is an ankle sprain, which often leads to a tight rear foot that leads to an overly mobile midfoot and pronation issues. Developmentally, if a child starts to walk, say at the age of 6-8 months, their brains are often not ready to coordinate the muscle actions of the foot, leading to learned over-pronation. (P.S. the normal age for walking is 12 months) Finally, the un-natural causes of muscular imbalances in the foot are improper shoe wear. I believe there is no coincidence that 90% of bunions are diagnosed in women in industrialized countries. Narrow toed high heeled shoes are the main culprit. These shoes are a mechanical nightmare for your feet! (Again, I will spend a full blog on the mechanics of wearing high heel shoes.) How Can You Help? If you’re young and your balance is poor, or you are starting to see your big toe shifting, find a health care specialist who isn’t just going to tell you to wait a few years and then have surgery. Find an expert to give you a plan to restabilize your foot. If you sprain an ankle, don’t just walk it off, find someone with a strong background in sports medicine and get it checked out and properly rehabbed. Do not encourage your children or grandchildren to walk prematurely before they are ready. And if you are going to wear high heels, don’t walk in them! 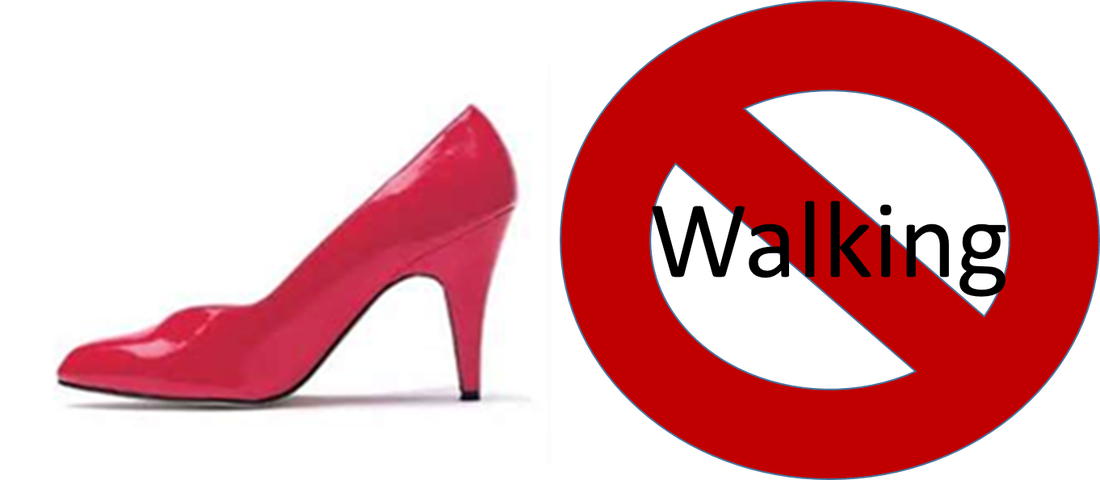 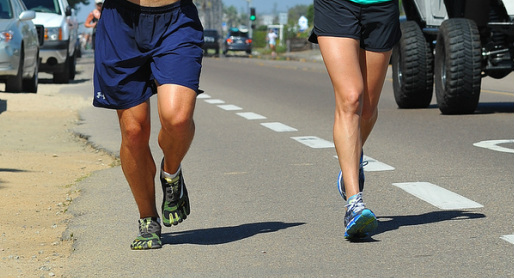 Running is one of the most popular recreational sports in the United States. What I love about running is that it is a lifelong sport. Attend any local 5k race and you will see age ranges from 12 year olds to 80 year olds running the same race. It’s also a sport that doesn't require really fancy equipment to burn a lot of calories. (I have already discussed the main expense in running, shoes, in my previous blogs.) Another great thing about running is depending on your preference or your mood; you can run in groups or by yourself. With all of the great benefits of running, I find it interesting that runners rarely focus on technique or specific skill training for running. Maybe this is why over 1/2 of all runners injure themselves every year. At Team Chiropractic and Rehab of Ames, it is our goal to keep runners out of pain and prevent as many sports injuries as possible. It you want to become a good golfer, of course you would buy a set of clubs. But, often new golfers will pay for golf lessons. Actually, all ranges of golfers find it advantageous to hire a Pro to help them with their swing. Not only does coaching in golf make the golfer a better player, but it can help prevent injuries that occur with poor swing mechanics. For some reason, the idea of swing analysis for performance and injury prevention has not translated into the running community as much as the other recreational sports like golf. In this blog we will discuss one of the measurable aspects of the running gait, foot strike, and how effects performance and injury rate. (All of the information I’m going to share with you is very practical, however runners that have certain anatomical variances or injuries should consult a qualified health professional before trying to change their gait)  It All Starts At the Crash Zone: What I call the “crash zone” is the area of the foot that first contacts the ground while striding. The contact that a runner uses when their foot initially contacts the ground, determines their efficiency/speed, footwear selection, and their ability to absorb shock. Foot strike also directly relates to the susceptibly for most common running injuries: Shin Splints, Patellar tendonitis, IT Band Syndrome, Bursitis, Hamstring Tendonpathy, Plantar Fasciitis, Stress Fractures. There are basically three different ways to contact the ground when running:  Heel Strike- When the outside corner of the heel first impact the ground and then the foot rolls through to the mid and forefoot before toeing off. This type of impact mimics the foot contact while walking.  Midfoot Strike- When the first part of the foot that touches the ground is slightly behind the ball of the foot. After the initial contact, often the heel will briefly touch the ground before the gait cycle progresses to supination and the foot leaves the ground through toe off.  Forefoot strike- This is the classic “toe runner”. The first foot impact will be on or slightly in front of the ball of the foot. Rarely does the heel touch the ground with this type of running foot strike. Most sprinters use this contact; however there are people that use this type of contact to run long distances as well. Running with a Flat Tire: 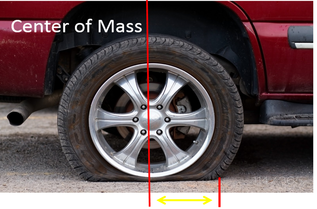 Imagine if you raced two identical cars of the exact same year and model, but one car had a flat tire. It is quite easy to guess which car would win in this race. If you look at the picture of the flat tire below, you can see the large distance between the center of mass over the axil and the tipping point of the wheel. The greater the distance the more energy it requires to keep the wheel rotating. The same goes with running form. Runners who heel strike will have a foot impact at greater distance from their center of mass then an individual who impacts on their midfoot or forefoot. Most heel strikers are what we term “over striders”. Over striding puts them at a disadvantage biomechanically to preserve their momentum by reaching their leg out further from their body to heel strike (running with a flat tire). 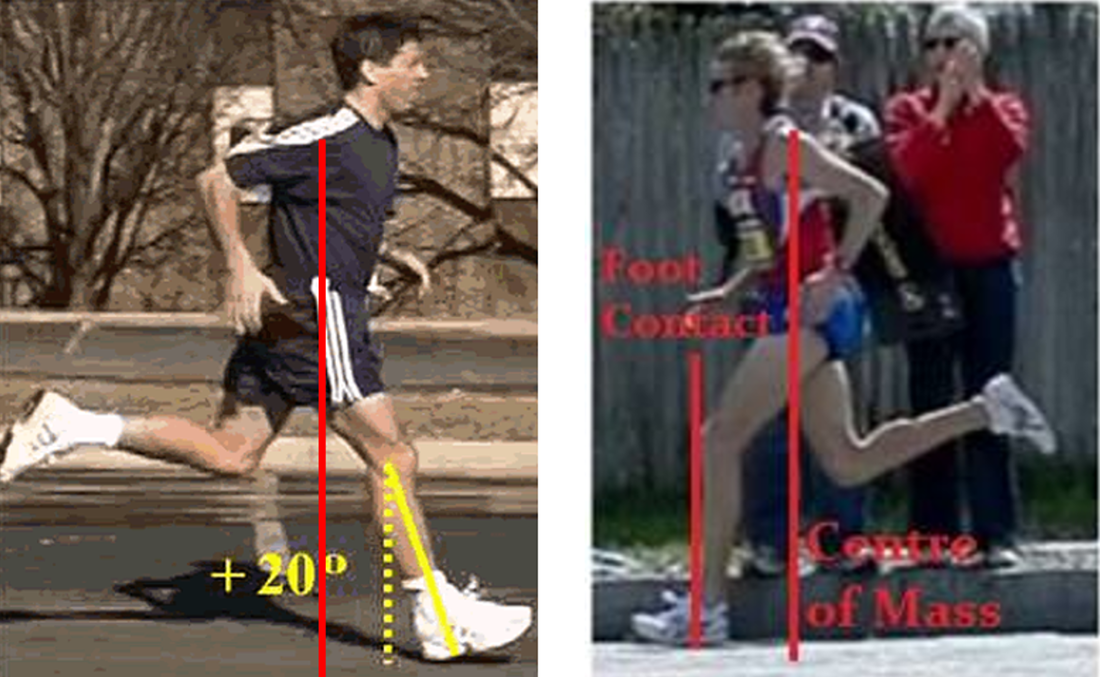 It may seem mathematically advantageous for the heel striker with the long over stride when running long distances. The longer the stride, the less steps they need to take, right? Wrong, this is the most common amateur running mistake. Stride length is not as important as stride rate in any form of human running (sprinting or distance). Let’s do the math to prove this point: Assume that a 5 foot tall individual wants to run a mile. Typically your jogging stride length is just below your height. Studies show that the average stride length for armature runners is only 120 strides per minute (spm). - A typical heel striker runner runs at 120 spm x 4.5 foot stride = 540 feet per min (just under 10 min mile) - A heel strike runner who really over strides at 120spm x 5 foot stride= 600 feet per min (9 min mile) - A mid or forefoot striker who has a shorter stride but a faster cadence can do 160spm x 4 foot stride= 640 feet per min (8:15 mile) You can see that even with a much shorter stride length, the faster cadence or stride rate, ran much faster than even the supper over strider. By the way, 160 spm is a realistic goal for most recreational runners. An elite professional runner usually has a stride rate of 180-200 spm. Running with a Flat Tire While Stepping On the Breaks: Mathematically it should make sense why heel striking and over striding reduces running efficacy. But, anatomically and physiologically, heel strikers are at a disadvantage as well. By fully extending the leg to heel strike the runner does two things that put their bodies at a disadvantage (turn on the breaks). First, the extended heel striking leg has to fully lengthen the hamstring (the rear muscle to the leg). Weight lifters know that a long muscle is not a strong muscle. Running is all about elasticity in the muscle and tendons of the legs. When the muscle length is in a neutral position its tension to force relationship is at its maximum. However, when a hamstring is completely stretched out to because of the over striding, it loses a majority of its elastic springiness, leading to a slower cadence, more energy wasted by the muscle, and a decreased ability to absorb shock (can you say hamstring tear?). The second physiologic disadvantage of over striding is the body has to isolates muscle use. For example the quad (front leg muscle) has to fully contract to extend the leg fully to reach the heel contact. Verse in a midfoot strike the leg contacts the ground perpendicularly to the ground, letting both the hamstring and quad muscle function in a neutral length, which improves muscle elasticity and shock absorption. 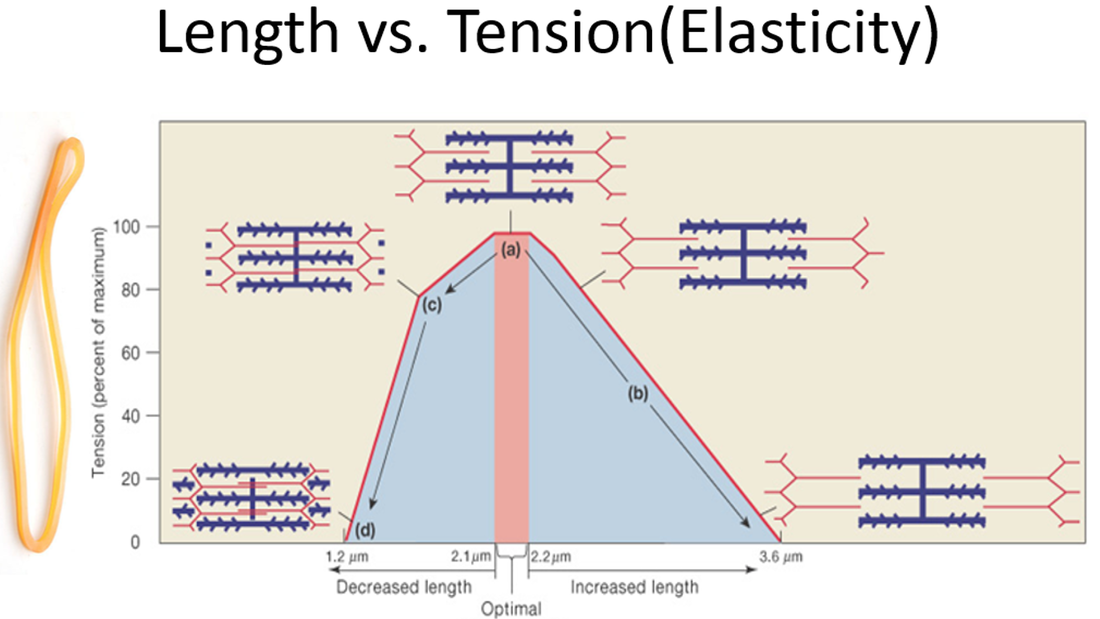 There is one other disadvantage biomechanically to heel striking while running. To get the foot in a position to heel strike, the body needs to move up and down vertically more to let the heel travel over the ground before striking. This is a big waste of energy and increases the ground impact force on every stride. Usually the objective with running is to use our energy to move forward, not up and down. The best graph to visually explain the differences in force transmission in different foot striking patterns is below. If you notice the one big difference in the parabolic arcs is the sharp initial peak formed when the heal striker first impacts the ground. Imagine the arc of the graph was that of path of a pebble that you toss to someone. On the curve of the midfoot striker the curve was very controlled and smooth, therefore the pebble would be easy to catch. Imagine on the heal strike graph that we took the pebble and placed it in a sling shot and then fired it. That increased rate of force at the impact of heel strike is like the pebble traveling at a much faster rate and can cause injury when trying to catch it. If the rate of the impact force is too fast, the human body cannot “catch” or absorb the forces effectively, meaning the bones, tendons, ligaments and muscles are susceptible to injury. 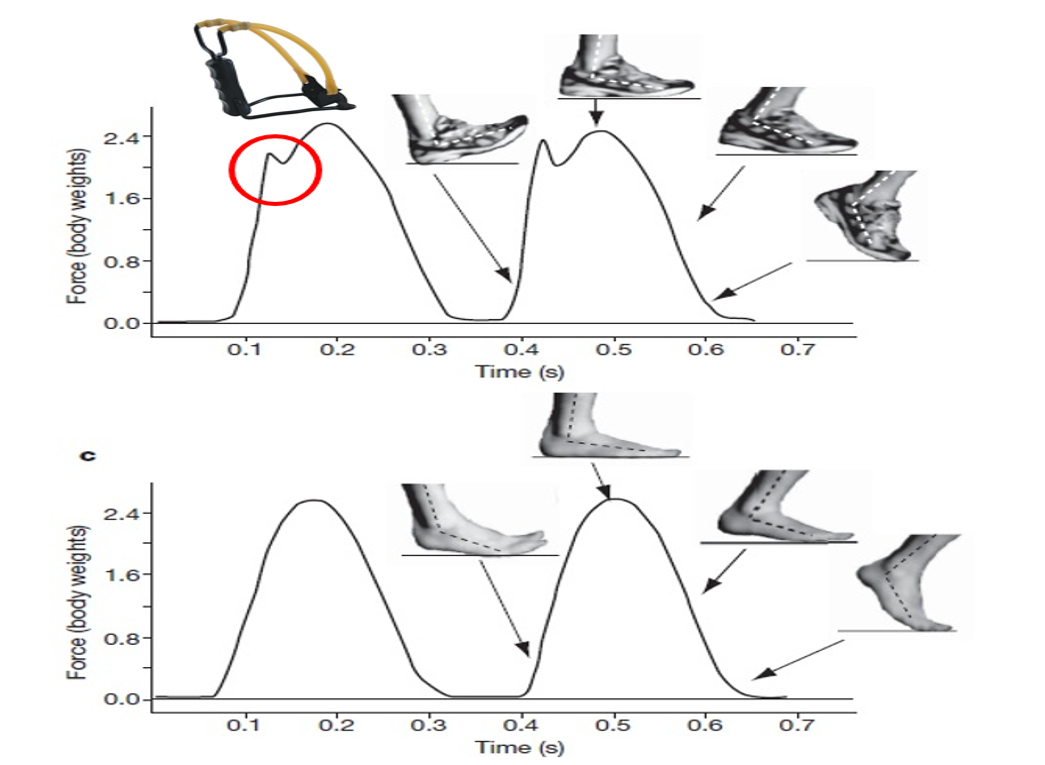 How Do Shoes Fit In? Because most recreational runners have been exposed to high drop running shoes their whole lives, we have tricked our bodies into thinking it’s OK to hit the ground with our heels while running. I have discussed the reasons for this in my previous blogs on minimalist shoes and shoe fitting. It’s interesting how humans have been running for millions of years, yet within a few decades of wearing athletic shoes, many of us have completely forgotten how to run effectively and safely. If you want to make a change to running on your mid foot, find a shoe with a lower drop and a wide toe box to let your foot expand when running. However I do caution you that changing to a zero drop shoe “cold turkey” can be dangerous. Give your body time to transition to a new shoe, vary the shoes over the week and start with a hybrid shoe first before a full zero drop shoe. What about Forefoot Running: As I mentioned earlier, forefoot running is mostly done in sprinting. Running on the forefoot does lead to faster stride rates, but there are some distinct disadvantages to forefoot running for a long distance. First, just like heel striking, forefoot striking causes muscle to work in isolation and in shortened or elongated states. Forefoot strikers often have injury problems with their calf muscles because they have to contract and shorten during most of their gait cycles, leading to strains, tears and Achilles injuries. Also landing on the forefoot is not as stable as a midfoot strike (imagine running in high heel shoes). This instability will put the tendon and ligaments at risk (ankle sprains and Achilles tendonitis). Finally and not a big surprise, toe runners will have issues with stress fractures and injuries to their toes, the function of the four smaller toes is to help with balance, not to absorb shock on impact. How to Make a Foot Strike Change: Changing your gate is like learning to write with your non-dominant hand. You may have spent years running with a heel strike, it is imposable to change that overnight. I suggest a transition period of 2-3 months to make a gate change. First it take muscles several week to change in length, you can only expect injuries if you don’t let your body slowly adapt to the new running technique. Next there is the mental aspect of changing your form. Most people like to run because it lets them turn off their minds and relax. When you try to change your gait, you have to be consciously aware of every new movement your body makes. It will again take several weeks for this new running form to become reflexive or unconscious. I suggest in the beginning of the transformation, you only focus on form and technique for 1-2 minute periods during your run. For example after every mile, you focus on technique for an 1/8th of the next mile. Making the change to a midfoot strike is well worth the effort, you will be less susceptible to injury, and be a more efficient and faster runner! |
AuthorDr. Chris Feil Archives
February 2024
Categories
All
|
||||||

 RSS Feed